Podcast input monitoring and export troubleshooting
Trace input, monitoring, recording, and export, with reproducible synthetic WAV examples for duplicate paths, clipping, quantization, and sample-rate differences.
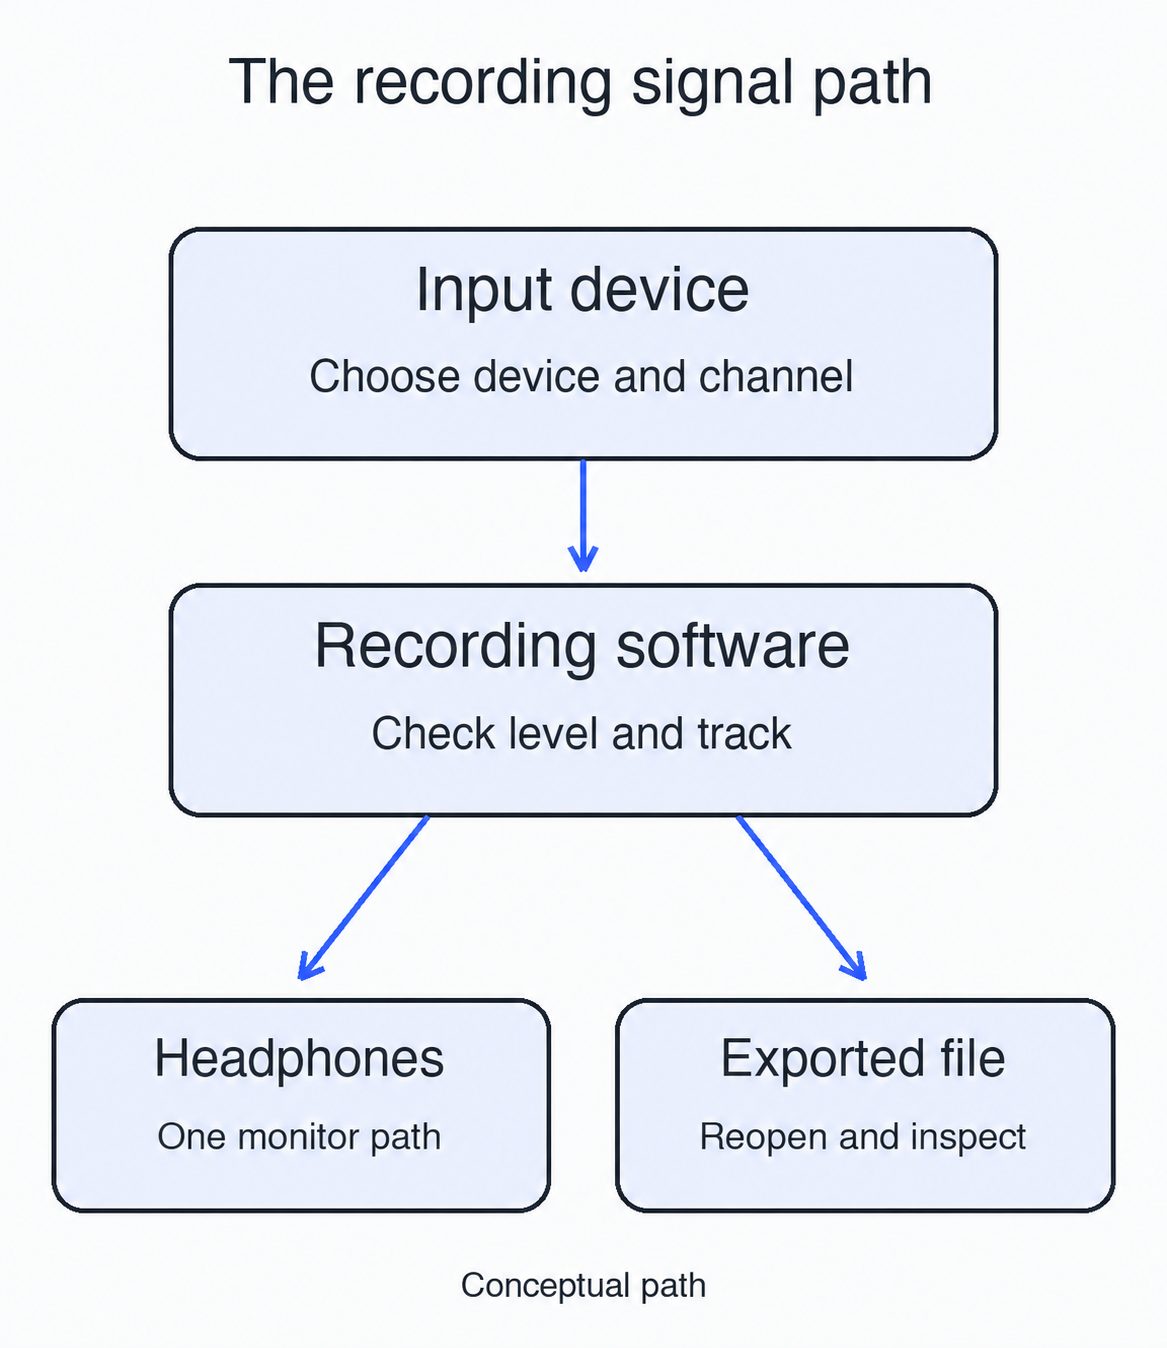
Your headphones may carry the microphone signal while the recorded file is silent. Or the file may sound correct while you hear the signal twice in your headphones. Follow the signal one stage at a time: the device input, the selected software channel, the monitoring route, and the track saved in the exported file.
Check input, monitoring, recording, and export in that order to locate a missing or duplicated signal. The workflow below draws on the official OBS input and mixer guides, with reproducible synthetic WAV examples that explain delayed copies, clipping, and sample-rate labels.
Draw separate recording and monitoring paths
A common recording path is microphone → interface input and gain → software input channel → recorded track → exported file. A USB microphone integrates some interface functions, but the software still needs the correct input device and channel.
Headphone monitoring branches from that path. An interface can send direct monitoring to headphones before the signal reaches the software. Software monitoring sends the input through the application to an output device. Hearing direct monitoring does not establish that the application receives input. A successfully written recording can also coexist with the wrong headphone output.
Write down the intended input device, input channel, recording track, and headphone output. Keep actual device names in your own working notes. Start with one identifiable monitoring path: disable software monitoring when using direct monitoring, or disable direct monitoring when you need to hear software effects. This choice affects delay and which effects you hear; consult the manuals for the actual interface and application.
Check the device and channel before changing export settings
The official OBS Audio Sources guide describes adding Audio Input Capture to a scene and selecting a device in its Device property. With the input source identified, check that its signal reaches the recording track.
Choose a specific device so that Default does not hide a source that changes with system settings. Then check the channel associated with the connected input. A mono signal connected to input one of an interface may appear only on the left side of a stereo track. The official OBS mixer guide explains that a stereo source with only its first meter active will be heard only on the left. Once you have established that mono is intended, Downmix to Mono can change its channel presentation. It cannot repair a wrong device selection or an absent signal.
After the input meter responds, check that the track is enabled for recording, is not muted, and is included in the output. Verify the device, software input, and saved file separately; otherwise you may keep adjusting export settings when the application has no input.
Make a short recording and check monitoring separately
Disable duplicate monitoring paths and enable the intended track in your recording application. Record opening silence, an easily recognizable signal, and closing silence. Include the loudest expected part in the signal section. The silent sections help expose background noise and unintended input; the signal boundaries help reveal missed recording, delayed copies, and a truncated tail.
Stop recording, disable live monitoring, and play the recorded track. You can then hear the saved content without mixing the current input into playback. If headphones carry sound but the recorded track has no waveform or audio, return to the input device, channel, and recording switch. If the track is correct but headphone playback is silent, check the application output, headphone connection, and output volume.
Keep the recorded track and project, then export a PCM WAV reference. Reopen it and compare the channels, signal boundaries, and peak for the same section. At this handoff from the application track to the exported file, an omitted track, a partial selection, or a missing tail becomes visible.
Turning down a fader does not restore clipped samples
The file experiment used Python 3.9.6 to generate a three-second, 48 kHz, mono WAV. A 440 Hz sine starts at 0.5 seconds and ends at 1.5 seconds, with 10 ms fades at both ends and a peak amplitude of 0.25. Reading the 16-bit file back gives a −12.04 dBFS peak and no full scale samples among its 144,000 samples. These settings provide headroom for the demonstration; set speech gain from the loudest expected part of the actual signal.
A second version multiplies the amplitude by eight and clamps values outside −1 to 1. Its measured peak reaches 0 dBFS, with 31,678 samples at the full scale boundary. The waveform has flat tops. A third version multiplies this already clipped signal by 0.125. Its peak falls to −18.06 dBFS and the full scale sample count becomes zero, but the flat tops remain.
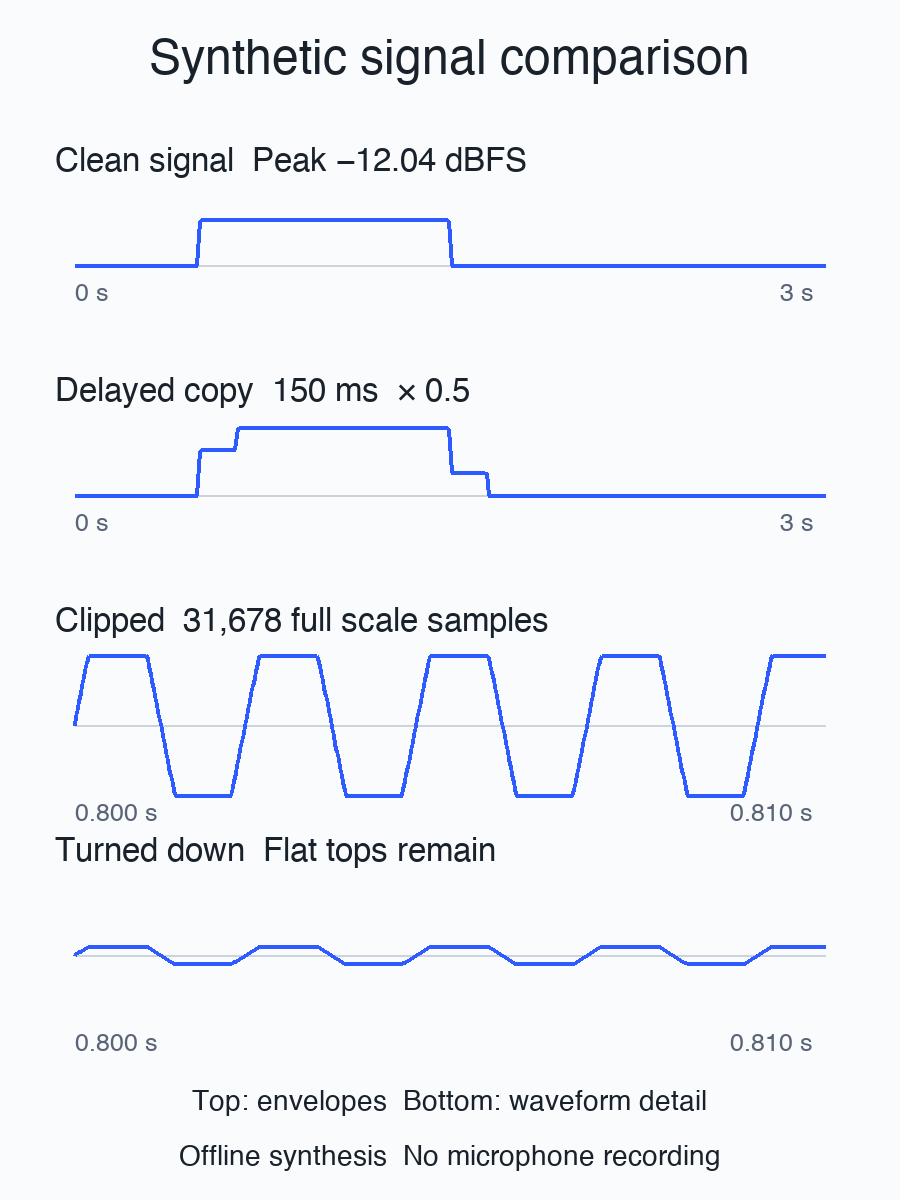
The upper rows show envelopes. The lower rows enlarge the same waveform interval.
This comparison explains why a low downstream meter does not establish that the original recording is clean. Reduce gain at the earliest stage you can inspect, then make another recording for comparison. The official OBS Audio Mixer Guide also recommends starting at the device and checking both there and after the signal reaches OBS. The interface gain knob, software fader, and headphone volume act at different points. Identify whether a control changes the input, track, or monitoring level before adjusting it.
Locate the second route when you hear a duplicate
The synthetic delayed-copy file uses y[n] = x[n] + 0.5 × x[n − 7200]. At 48 kHz, 7,200 samples represent 150 ms. The delayed copy therefore continues until approximately 1.65 seconds, after the original signal ends. This sample demonstrates delayed summation from two paths.
The 440 Hz sine and the 150 ms delay happen to differ by exactly 66 cycles, so the overlapping parts add in phase. The peak rises from −12.04 to −8.52 dBFS. Speech, a different frequency, or a different delay will combine differently; the 3.52 dB rise is not a fixed penalty for duplicate monitoring. The tail after the signal ends identifies the delayed copy in this synthetic file.
First determine where the duplicate appears. If only the headphones repeat the signal and the file is clean, check whether direct and software monitoring are both enabled. If the file repeats too, inspect whether the same device is captured twice. The official OBS Audio Sources page specifically warns that adding a device to a scene while also selecting it in Settings → Audio can cause an echo. Its recommendation is to disable that device globally before using the scene source.
Another failure occurs when output becomes input again: speakers feed a microphone, or a virtual route returns application output to its input. That can form sustained feedback, which differs from a single delayed copy. Stop the relevant output, inspect the routes individually, and use headphones with one monitoring path. Raising volume to find the signal can make the loop worse.
Reopen the export and inspect channels duration and waveform
A file on disk confirms a save operation. Reopen it to establish that it can be decoded and has the expected channels and duration. Locate the silence, signal, and tail before deciding whether its format suits further editing or delivery.
The same synthesized signal was written as 24-bit and 16-bit PCM WAV and read back with Python’s wave module. Both contain 48 kHz mono audio, 144,000 frames, and three seconds. The maximum absolute difference between normalized samples is about 0.00001530, caused by integer rounding in this script. The script rounds directly to integers without dither; the value describes the sample difference between these two synthetic files.
A deliberately incorrect file keeps the same 144,000 PCM samples but labels them as 44,100 Hz in the WAV header. Its read-back duration becomes 3.265306 seconds. Interpreted at that rate, the 440 Hz tone becomes 404.25 Hz. Changing a sample-rate label and actually resampling are different operations. Actual resampling recalculates samples at the target rate while preserving duration and pitch. If an export changes speed or pitch, compare the project settings, file properties, and conversions used.
| Synthetic file | Read-back result | Purpose |
|---|---|---|
| clean-16bit.wav | 48 kHz mono 3 seconds −12.04 dBFS | 16-bit clean reference |
| clean-24bit.wav | 48 kHz mono 3 seconds −12.04 dBFS | 24-bit quantization comparison |
| echo-150ms.wav | Delayed tail to about 1.65 seconds | Identify a second path |
| clipped.wav | 0 dBFS 31,678 full scale samples | Inspect clipping |
| clipped-then-quiet.wav | −18.06 dBFS flat tops retained | Separate level from distortion |
| wrong-rate-header.wav | 44.1 kHz 3.265306 seconds | Separate labeling from resampling |
A PCM reference is useful for checking the chain and continuing to edit. Lossy encoding can change the waveform, peaks, and interpretation of file length, so check the actual delivery format separately. When delivering MP3 or AAC, keep the PCM reference and compare the encoded file’s boundaries, channels, and peak. Set the loudness target from the requirements of the actual publishing platform.
Download the synthetic examples and compare the waveforms
The synthetic examples and generator contain six WAV files, a Python script, and measured results. Running python3 make_samples.py creates a samples directory and result JSON beside the script. It opens no audio devices. Lower player volume before auditioning, especially for the clipped file.
Input and mixer settings draw on OBS Audio Sources and Audio Mixer Guide. The numbers and comparison figures come from the synthetic files and script in the download. Use the official manual for your actual interface to set connections, gain, and direct monitoring.